|
OXYFUELWELDING
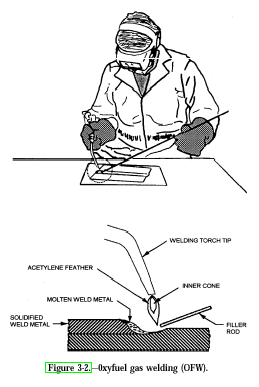
Preparing the metal to be welded1. Clean the metal joints to be welded of all scale, rust , dirt,paint, and/or grease. Any foreign material that enters the molten puddle will change the metal composition and weaken it. 2. Base metals 1/8 inch or less do not require beveling, but thicker metals require additional prep work. 3. Place the metal to be welded on the work table and determine if and where tacking may be required. Note: as a welding bead is applied, the two pices of metal may tend to pull together, closing the penetration gap. To prevent warping:1. Fuse the ends of the two pieces of metal together before welding. Long pieces may need to be fused every few inches or so along the joint. 2. Long pieces may require an additional penetration gap. Add 1/8 to 1/4 inch per linear foot. Forhand and Backhand Welding TechniquesTwo techniques are used for oxy-fuel welding: forehand and backhand. The forhand technique is usually recommended for welding material up to 1/8-inch thickness because of better control of the small weld puddle, while backhand welding is generally more suitable for material 1/8 inch or thicker. Increased speed and better fusion at the root of the weld are normally achieved with backhand welding. In the forhand technique, the welding rod precedes the tip in the direction of the weld. The flame is pointed in the same direction as the weld and is directed downward at an angle, which preheats the edge of the joint. The torch tip and welding rod are manipulated with opposite oscillating motions in semi circular paths to distribute the heat and molten metal uniformly. In backhand welding, the torch tip preceeds the rod in the direction of the weld, and the flame is pointed back toward the molten puddle and completed weld. The end of the welding rod is placed in the flame between the tip and the weld. Less manipulation is required in backhand weldin than in forehand welding. Starting and Finishing the weldThe forehand butt weld with filler rod is one of the most common joints made. The basic procedures of the butt weld can be applied to any other type of joint. 1. Tack or fuse the base metals at the predetermined intervals. 2. Hold the torch at an angle of approximately 45 degrees to the base metal gap. 3. Move the torch tip over the starting edges of the joint and rotate the flame near the metal in a circular motion until the base metals run into a puddle. 4. Dip the end of the filler rod in and out of the molten puddle. The molten puddle will melt the rod and add to the puddle. 5. Continue the dipping motion of the filler rod in the puddle and move the torch back and forth accross the penetration gap. 6. Advance the circular or semicircular motion approximately1/6 inch per motion until the end of the joint is reached. 7. Since the angle of the tip flame is preheating the metals ahead of the weld, the last 1/2 inch of weld is critical. Slightly raising the welding tip increase the addition of filler rod to ensure a full, smooth weld, 
when you finish your welding :1. First shut off the torch oxygen valve. If this procedure is reversed a "pop" may occur. The pop throws carbon soot back into the torch and may in time partially clog gas passages. 2. Close both cylinder valves. 3. Open the torch-handle oxygen valve and let the oxygen in the system drain out. Close the torch oxygen valve. 4.Turn the adjusting screw on the oxygen regulator counterclockwise to release all spring pressure. 5. Open the torch-handle fuel valve and release the pressure in the system. Close the torch fuel valve. 6. Turn the adjusting screw on the fuel gas regulator counterclockwise to release all spring pressure. 7. Check the H.P. guage after a few minutes to be sure the cylinder valve has been turned off completely.
|


